Fill out this form to send us a ticket
CFBC HELP CENTER
Ministry Forms
Borrowing
Equipment Borrowing Form: Download
Kitchen Equipment Borrowing Form
Kitchen Equipment Borrowing Form: Download (Coming Soon)
Finance
Agape Fund Request Form: Download
Finance Reimbursement Form: Download
Ministry & Info
Child Protection Policy: Download
LiveScan Application: Download
Ministry Application: Download
Insurance/Risk
Accident Report Form: Download (Coming Soon)
Calendar (All Events)
This is the place that collects all prospective events for Cornerstone. Please review this calendar to ensure availability. Events appear on this calendar if the “Add to Calendar” resource has been added to its event in CCC. **THIS CALENDAR IS UPDATED EVERY 24HR** Always confirm your selected date with by submitting a ticket using the form above.
[ics_calendar id=”16934″]
Ministry Leader’s Guide
For an overview of the operations and protocol of each ministry please visit the ministry guide by clicking below!
Events, Room, & Resource Requests
Creating and Event, Room, or Resource Request: Step-by-Step
Rooms and Resources are requested once an Event has been created and added to the Group Calendar.
- Open the Group where the Event, Room, or Resource is to be created.
- Choose the Calendar tab and select the date to add your event.
- Complete the “Create New Event” form. Be sure to check, “Add Rooms & Resources.
- After you create your event, you’ll need to add your rooms, and resources by clicking on the grey button that says “Request Rooms and Resources.”
- IMPORTANT: PLEASE INCLUDE YOUR EVENT ON OUR INTERNAL CALENDAR BY ADDING THE RESOURCE TITLED “ADD TO CALENDAR” TO YOUR EVENT, ROOM, and/or RESOURCE REQUEST.
General Setup Notes: Should be a summary of the event day and time, and an overview of the rooms, resources, and setup that is needed. This is the first place the Facilities Team will look in their report to set up for the event.
- Estimated Attendance: Is important to verify room occupancies, and to select alternate rooms in the case of a scheduling conflict.
- Rooms: Are reserved by clicking the Rooms tab, selecting the desired room from the menu, and then dragging it to the Rooms box. There will be an additional option to provide setup details for each room when it is selected. If a room is not available for a certain date and time it has most likely already been reserved for a different event.
- Resources: Are requested by selecting the Resources tab, selecting the desired resource from the menu, and then dragging it to the Resources box.
- IMPORTANT: PLEASE INCLUDE YOUR EVENT ON OUR INTERNAL CALENDAR BY ADDING THE RESOURCE TITLED “ADD TO CALENDAR” TO YOUR EVENT, ROOM, and/or RESOURCE REQUEST.
Begin your event, room or resource request
IMPORTANT: PLEASE INCLUDE YOUR EVENT ON OUR INTERNAL CALENDAR BY ADDING THE RESOURCE TITLED “ADD TO CALENDAR” TO YOUR EVENT, ROOM, and/or RESOURCE REQUEST.

FAQ
CCC (Cornerstone Community Connection)
People (CCC)
How do I change my group settings?
Once you create a Group, you will land on the Group settings page. To edit an existing Group:
- Go into the Group.
- Click the Group Actions button in the upper right.
- Select Edit Group Settings from the list.

General Settings

General
- Group Name: Enter a Group name up to 50 characters.
- When naming a Group, it is better to be campus specific if you have more than one campus.
- Also consider if the name of the Group pertains to the type of Group it is.
- Group Photo: To upload a photo for your Group click the Browse button and choose the image from your computer.
- The image must be in .jpg format and the size cannot be larger than 3MB.
- Description: Enter a brief description.
- If you’d like to use some basic HTML to include links or additional images, you can do that in this field.
Classifications
- Group Type: Select from the list of options.
- This is a key field for running searches and reports.
- We would recommend keeping your Group types simple and generic.
- If you are the Master Admin or have Edit System-Wide Settings admin privilege, you can customize this pulldown menu under System Settings > Customizable Fields.
- Think of Group type as the purpose of the Group. Some examples are Volunteer, Bible Study, Children’s Ministry, Sunday School, or Office.
- Childcare Available: Check the box to indicate whether or not there is childcare available for the Group. Note: This does not actually request childcare as a resource.
- Custom Fields: Up to three additional Custom Pulldown Menus can be added for additional information if needed by going to System Settings > Customizable Fields.
Twitter Connection
- Link Twitter: You can link your twitter account to the Group to use our Twexting function.
- This link will only display after you have saved your Group the first time. Create the Group, save the changes and edit the Group again to see this link.
When & Where Settings

Tip: The information added here will help with the search on the Groups page.
When This Group Meets
- These options can be customized under System Settings > Customizable Fields > Pre-labeled Pulldowns.
- Meeting Day & Meeting Time: Select the best fit for your Group to help people find it in the Groups search based on this information.
Tip: We recommend more generic times like Morning, Evening, Afternoon rather than specific times of day to make searching more friendly for users.
Where This Group Meets
- Area of Town: Select the best fit for your Group to help people find it in the Groups search based on this information.
- Street: Location where your Group meets.
- City: City where your Group meets.
- State: State where your Group meets.
- Enter up to 5 characters in the text field if you need an international address or use the drop down.
- Postal Code: Enter the 10 character postal code.
- Country: If needed, enter the country where the Group meets.
Tip: Meeting Day, Meeting Time and Area of Town can be customized in System Settings > Customizable Fields.
Options Settings

Settings
- Email Notification: Sends an email to the Group Leaders when a participant joins or leaves the Group on their own.
- Interaction Type: Select how your Group will operate:
- Members Interact: Allows each member to see the Participants tab in the Group and view names and photos of others in the Group with them. Note: Profile Privacy Settings determine which info shows in the Participants list for other Group members.
- Announce Only: The Participants tab is hidden from Group members. Only the Group Leaders are able to see the members and, by default, only leaders can communicate with all Group members.
- Administrative: The Group is only visible to the Group Leaders and anyone with Full Group admin; Group members do not know this Group exists or that they are in it. This interaction type prevents Group members from being able to access Needs, Messages, Events or Invites to Events, etc.
Note: Changing the interaction type will change the suggested defaults in the Member Privileges and Communication Defaults sections. Remember to adjust these settings if you prefer something different.
- Membership Type: Select how people are able to be added to this Group:
- Open To All: Allows anyone who is not yet in the Group to see all information including, events, messages, files, and needs or this Group. This setting also permits non-group members to join the Group without leadership approval.
- Request Required: Prevents any of the Group’s information from being visible to non-group members. In order for someone to join the Group, they must request to join or be invited by Group Leaders.
- Listed: If you would like your Group to be searchable by all logged-in users, check this box.
- Public Search: If you want this Group to be included in the logged-out, Find a Group search, check this box.
Group Member Privileges
- Messages: Allows Group participants to send messages to the Group without Group leader approval.
- Needs: Allows Group participants to create new Needs lists and send them out to the Group without Group leader approval.
- Files: Allows Group participants to upload files without Group leader approval.
Group Participant Communication Defaults
- Receive emails sent from the Group: If unchecked, Group participants will not receive ANY emails from the Group ranging from messages, event invitations, needs information, positions and schedule requests.
- Receive comments from Group participants immediately: Sends an email for every comment that is posted to a Group message.
- Receive a weekly summary of Group: Sends an email once a week detailing all of the activity for the Group that week (e.g., new events, needs, positions, etc.).
- Receive texts sent from the Group: Allows text messages to be sent to participants who have their mobile carrier and number saved in their Profile and have opted in to text messages from this Group in their personal communication settings. If you are a church outside of the U.S. you may need an additional service to make this possible. Check out this article for more information.
How do I add people to my group?
There are two ways to access the add/invite screen:
From the Participant Tab
- Start by accessing the Group you wish to add new members to.
- Select Participants tab.
- Click New Member.

- You will be taken to the Add or Invite to this Group overview page.

From the Group Actions menu
- Start by accessing the Group you wish to add new members to.
- Click Group Actions in the upper right.
- Click Edit Participants List.

- Under Actions on the right, click “Add or invite new people”.

- You will be taken to the Add or Invite to this Group overview page.
Is It Best To Add Or Invite Someone To A Group?
- Adding a person simply puts them in the Group. No notification is sent to tell them they were added.
- Inviting a person allows you to send an email to the person with a link to view the Group and find out more about it, then they can join the Group if they’re interested.
Warning: If a person does not have an email address in their Profile, they will not be notified of the invitation.
How do I remove people from my group?
- Go to the Group you wish to remove individuals.
- Click Group Actions in the upper right.
- Select Edit Participant List.

- Select the checkbox to the left of the individuals you want to remove.
- Click the pulldown menu directly above the Name column.

- Select Remove from Group.

- Click OK.
Tip: Keep in mind, you can only remove one page of participants at a time.
How do I use group files?
Who can use Group Files?
- Group Members: If the Group setting for members is enabled.
- Main and Assistant Group Leaders: If the Group setting for leaders is enabled.
Viewing Group Files
- For Groups that are Listed and Open To All, any person who clicks into the Group will be able to view and download the File.
- For Groups that are Invitation or Request Required, or Unlisted, only Group Participants (Leaders and Members), Coaches, Directors, File admins, and the Master Admin will be able to view and download the File.
Uploading Group Files
- Click on Groups in the left navigation menu.
- Select the Group you want to add the File to.
- Select the Files tab.
- Click the New File button.
- In the modal window that pops up, click Choose File.

- You can also choose to Drag and Drop the File by dragging it over the Choose File button

- Add an optional Label and/or Description for your File.
- Click Save to finish uploading.
Note: You can only replace one File at a time this way.
- When your File has finished uploading, you will receive a confirmation message at the top of the page
Tip: Files can also be uploaded as attachments to a Group message and you can attach up to three Files.
File Limitations
- These characters are not permitted in the File’s title:
- @
- #
- File name can not be longer than 64 characters, including .com.
- The maximum File size is 10mb.
- There is not a limit on the number of Files you can load to a Group, but you do have a system-wide limit. Check out this article for more information.
Replace Group Files
Replacing Files is a great option when you have an updated version of a File that’s already been uploaded. Anywhere that you have used an HTML link to the File will continue to work, because the URL for where the new File is stored will not change.
- Click on Groups in the left navigation menu.
- Open the Group that is storing the File to replace.
- Select the Files tab.
- Click the Replace Files link to the right of the File.

- When your File has finished uploading, you will receive a confirmation message on the Group Files page.
Tip: With the Files Admin Privilege, you can also replace a File from the main Files page.
- Click on Groups in the left navigation menu.
- Click the Files tab.
- Click the Replace File link to the right of the File.
The options are the same as when uploading a new File. You can enter information for the label, toggle whether or not to require login to access the File, or add/remove/edit the File description.
Editing Group Files
- Open the Group that is storing the File to edit.
- Select the Files tab.
- Click the Edit Details link to the right of the File.
- When your File has finished updating, you will receive a confirmation message at the top of the page.
Tip: With the Files Admin Privilege, you can also edit a File from the main Files page.
- Click on Groups in the left navigation menu.
- Click the Files tab.
- Click the Edit details link to the right of the File.
You can edit the Label, whether or not to require login to access the File, or add/remove/edit the File description.
Deleting Group Files
- Open the Group that is storing the File to delete.
- Select the Files tab.
- Click the Delete link to the right of the File.
- You will receive a pop-up box verifying that you would like to delete the File. It may take a minute to complete.

- After the File is deleted, the Group File page will refresh, and the deleted File will no longer be visible.
Tip: With the Files Admin Privilege, you can also delete a File from the main Files page.
- Click on Groups in the left navigation menu.
- Click the Files tab.
- Click the Delete link to the right of the File.
Warning: Deleted Files cannot be retrieved, so you will need to confirm that this is what you want to do.
How do I create a group message?
Who can Send a Message?
- Messages Admins: Can send a Message to any Group visible to them (which will encompass listed Groups only, unless they have Group admin privileges as well).
- Group Leaders, Assistant Leaders: Can email any Group they oversee either as a whole or by individuals.
Sending Messages
An email can be sent to the entire Group, Group leaders or an individual, if you are that Group’s leader.
If a Group Member would like to send an individual Message to a Group Member this setting needs to be active in the Group’s settings. In addition, to the email settings under Privacy Defaults need to be set to ‘My Groups Members & Friends’ or ‘Everybody’.
Sending a Message to the Group
- Go to the Group’s homepage and click the Messages tab.

- Click the New Message button.
- You will see a pop-up to start composing a new Message.
- Decide on your recipients.
- If you are a Group Member only, this will be set to all participants.
- If you are a Group leader or an Admin, you can select between all participants, the leaders, or specific Group Members (by name)
- If the Group is an Administrative Group, this will set to the leaders.

- Depending on who you send the Message to and how you accept replies, will determine whether you can or can’t choose the Don’t Store this Message and Pin this Message at the Top options
Tip: If you would like to send a Message and allow comments, you must select All Participants. Then in the recipients’ email, they will see the ‘Comment’ button.

Note: Comments posted as replies to most Messages will be visible to all Group Members. If the Message was sent only to Group Leaders and posted to the Message board, Group Leaders will be the only ones who receive the email, see the Message in the Group, and have the ability to add or view the comments.
- Next, enter the subject and body of the email in the boxes provided. You may use the formatting toolbar to quickly add lists, bold, or italics to the text.
- Finally, add any attachments to the email. Click Attach files to access the browse options. The files you attach will be sent as links in the email. These files will also be linked in the Message and added to the Group’s file library.
- Click Send to complete the process.

Sending to an Individual
- To send an email to one person in the Group, click the Participants tab in the Group.
- Find the person in the participant list.
- Click Send Email located next to the person’s name.
- You may also use the search box located next to the + New Member button. (Type the first or last name, or partial of either, and then Search.)
Note: Group Members will not see + New Member when searching for Group Members.

Editing a Message
Privilege Restriction: To edit a Message, you need to be a Group Leader/Assistant in the Group containing the Message, be the Message creator, or have the Messages admin privilege.
- Click on the Message title, which will take you to the Message detail page.
- Next click on Edit this Message on the right side under Actions.
- On the following page, you will be able to edit all fields of the Message.
- Click ‘Save changes’ when finished editing.
Deleting Messages
Privilege Restriction: To delete a Message, you need to be a Group Leader/Assistant in the Group containing the Message, be the Message creator, or have the Messages admin privilege.
- Click on the Message you wish to delete.
- Click the Delete Message.
- Changes to Messages will appear on the weekly summary notification email for those who have chosen to receive this correspondence in their communication settings.
Check out this article to learn more about Communication Preferences.
How do I respond to a group message?
Viewing Messages
Group Members can see the Messages sent to their Groups in two places.
From the Group Messages List
- From the Welcome Page, under the My Groups list, click the name of the Group.

- Click the Messages tab. This will show all of the Messages stored for this Group.

- Click the title of the Message to expand the Message and see all comments.

Note: If a Message is sent to Specific Group Members, the Message will not be stored on the Group’s Messages.
From the Welcome Page
The Messages tab on the Home page shows the messages from all your Groups as well as the Group’s that are Open to All.
- On the Home Page, click the Messages tab.
- The first button Group Messages are Group Messages system-wide.
- The second button My Messages are Messages that you as created.
- You can filter the Messages using the search bar, sort the Messages using the “Sort by Featured messages” dropdown menu, or click on the title of a Message to expand the Message and see all the comments.

Replying to a Message
Group Members can respond to a Message by posting a comment to the Message from the Group. There are two ways to access this Message comment area.
Note: Some Messages do not allow a response. This is an option that the Message creator has in addition to allowing replies to go to only the creator or to the whole Group.
From an Email
Quick Response
To sent a quick reply, you can simply reply to the Message in your email provider. This will send the email as a comment and store it in the Group’s history.
Respond In The Group
- Click the button Click Here to Comment from the email you received.
- Log into the site if prompted. (You will not need to log in again if you are already logged in.)
- Type your comment in the box provided and then click Add this comment.

From your Homepage
- Click on the Messages tab of the welcome paged.
- Click on the Message you wish to view.
- Scroll down to the bottom of any comments that may already have been posted.
- Type your comment and click Add this comment.
Your posted comment will appear at the bottom of the comment list by default. You can sort the list by using the sort options on the right side of the page.

What is Twexting™?
Twitter + Text = Twext™
Twexting™ allows Group Leaders to communicate with their Group in two different but connected ways. First, for those group members whose communication settings allow, a text message will be sent to the mobile number listed. Second, if a Twitter account has been connected to the Group, a status update will post to the Twitter page. The following sections will show you how to connect your Group to a Twitter page, how an individual may update their communication settings to allow text messages, and how to send a Twext™.
Warning: A Twext™ message never accepts replies. It is only a one-way communication.
Who can Send a Twext™?
- Group Leaders, Coaches, and Directors can send Twexts™ for their Groups.
- Coaches and Directors are available with Deluxe version.
- Master Administrator for any Group.
Privilege Restriction: Full Group Admins and Department Admins cannot send a Twext™ for Groups without being a Group Leader, Coach or Director.
Sending a Twext™
- Open a group you want to send a Twext™ from.
- Click the Group Actions menu.
- Then select Send a Twext™.

Warning: A Twext™ is only 140 characters long. While you may be able to paste in more characters, they won’t send consistently or at all depending on the carrier. Tip: If you want to send a link in a Twext™, use a URL Shortener to help send it consistently to all carriers.
Twext™ Communication
Twexting™ from the software should be viewed as a broadcast (one directional) message rather than a conversational or bi-directional message. It’s intended to quickly reach people who would read a text message before they would check their email inbox. Each mobile carrier handles texting differently. As such, in a scenario like this one, a person cannot reply to a text as it will not reach the sender. Nor can a person use that number to initiate a text.
Connection Scenarios
There are four possible scenarios, depending on what is connected.
Twitter Connection Disabled/No one signed up for Text Messages
If you have not yet connected a Twitter account to this Group AND no Group members have changed their communication settings to receive text messages from the Group, the Send a Twext™ window will look like this:

Because there is no outlet for these messages, no communication will be sent if Send Now is clicked.
Twitter Connection Enabled/None signed up for Text Messages
If you connect your Group to Twitter, but there is no one in the Group signed up to receive text messages, your Twext™ will post as a status update to Twitter, but it will not be sent as a text message directly to anyone. The Twext™ window will look like this:

Note: Anyone who follows this Twitter account and has their Twitter settings enabled to receive a text message with new tweets will still receive a text message, but it will come from Twitter directly, not through Church Community Builder. Twitter Connection Disabled/One or more signed up for Text Messages
In this scenario, you have not connected your Group to a Twitter account, but people have turned on text messaging in their Communication Settings.

The number of people who will receive the text message will be visible. Clicking Send Now will send the Twext™ as a text message but will not post an update to a Twitter account.
Twitter Connection Enabled/One or more signed up for Text Messages
This scenario combines the benefits of Twitter and text messaging to communicate to your Group. Those who wish to receive an email instead of a text message can indicate so in Twitter and do not have to adjust their communication settings to allow text messages. Those who prefer not to use Twitter can receive a text message through Church Community Builder, and those who would prefer to view the Twext™ within the Group can do so too.

When you click Send Now, the Twitter feed will be updated and a text message will go out to anyone who’s chosen to receive them.
Connecting to your Twitter Account
You may use any Twitter account to connect to your group in Church Community Builder. You will need to know the login and password for the Twitter account. Multiple groups may use the same Twitter account, or you can connect a separate Twitter account to each Group in your software.
Privilege Restriction: The General Settings area is editable by Group and Department Admins, the Master Administrator, and Group Leaders with appropriate privileges for their Groups.
- Open a group you want to send a Twext™ from.
- Click the Group Actions menu.
- Select Edit group settings.
- On the General tab, scroll to the Twitter Connection section.
- Click the Connect button.

- Type your username and password.

- Click Allow to connect the Twitter account to your Group.
Change or Delete Twitter Connection
- Open the Group you want to work with.
- Click the Groups Actions menu and select Edit group settings.
- On the General tab, scroll to the Twitter Connection section.
- Click Disconnect to remove the connection to the Twitter account.

- If you are wanting to change your Twitter account, once the old one is removed, just click the Connect button to connect to the new account.
Texting Communication Settings
The communication setting for Twexting™ is set to the Group’s settings by default. Each person can determine if they want to receive text messages and from which Groups. Because of the possible cost associated with receiving text messages, it is important Group leaders and administrators who can access the communication settings page for other people do not make changes to this option.

- Log into the site and search for individual to change settings.
- Click the Action button.
- Select Communication Settings.
- In the Send me text messages from group leaders column, select your carrier from the pulldown menu and verify or add your mobile number.
- Select the Groups from which you wish to receive text messages.
- You may also choose whether to receive text messages from new Groups you join or are added to in the Future Group Defaults section.
- Once you have selected all your Groups click Save Settings.
Events (CCC)
Adding your event to your group calendar, and reserving rooms and resources will ensure that the the Facilities team is
All group Leaders can create and edit any Event in a Group they lead.
- Open the Group that will host the Event.
- Choose the Calendar tab.
- Click + New Event button.
- Or, hover over a Calendar day and click the Add Event link.

- Complete the required fields in the Create New Event popup.
- Click Create to add the event to the group calendar.

- Event Title: This is the Event name that will show on Calendars, invitations, etc.
- Group: If you did not create the Event directly from a Group page, you will have to choose the Group to host the Event here.
- Event Organizer: Here you can choose an Event Organizer. The Event Organizer must be a member or leader of the Group you select.
- Date: This is the day of the Event.
- Event Time: This is the actual time of the Event; it does not include setup or cleanup time.
- All day event: Select if a room is needed for a multi-event day.
- Make this event repeat: Allows the event to be repeated weekly, monthly, and on certain days of the week. All repeating events must have an end date. No event should repeat beyond the end of the current ministry year.
- Enable Check-In: Select if you plan to use a manned or unmanned check-in station for your event, or if you plan to have attendees self check-in for attendance.
- Add Rooms & Resources: Use this option for Events at the Campus and need to reserve a Room or resource OR need approval from Event Admin OR need to use the check-in options.
- Setup/Cleanup: Setup and cleanup times are entered in minutes and are used to determine resource conflicts. This option is only available for at-the-church Events.
- Event Phone Number: The number provided should be that of the person organizing the Event, not necessarily the Group leader. (Their Profile must be Listed)
- Use an address other than CFBC Riverside: The system will automatically input the Campus’s location for Events. That is the location that will automatically be included in the Calendar feed and Event download. If the Event will take place somewhere else, check this box to enter address information and override the default.
- Description: This will appear on the Event overview page, in an Event Invitation, and in the Event pop-out from the monthly view of a Calendar. It will also show up on the approval page and both setup/resource reports.
- Photo: Much like uploading a photo for a Group the same applies for uploading an image to an Event. You will choose a file from your files on your computer. The image must be in .jpg format the size can be no larger than 3mb that is about 3000-4000px.
- Description: This will appear on the Event overview page, in an Event Invitation, and in the Event pop-out from the monthly view of a Calendar. It will also show up on the approval page and both setup/resource reports.
- Require leader approval or Form Response to get on the guest list: This checkbox requires leader approval (group leaders and the Event Organizer) or a matched Form response to get on the guest list.
-
- If you check the box this will change the button to RSVP OR Register, which helps the Event Organizer and Group Leaders decide who should be on the guest list.
- If this box is not checked any individual who has access to the Event can reply to the Event allowing the Event Organizer to monitor the guest list.
-
Tip: You must create a Form before you can connect to the Event to match guests to a Form registration or see the Register button on an Event, check out this article to learn more.
IMPORTANT: PLEASE INCLUDE YOUR EVENT ON OUR INTERNAL CALENDAR BY ADDING THE RESOURCE TITLED “ADD TO CALENDAR” TO YOUR EVENT, ROOM, and/or RESOURCE REQUEST.
Events are calendared after they are created and published. To Publish your event, select the event on your group calendar and select Manage Event.

Select the Publish tab and add the event to the Public calendar or Church-wide calendar.

- Group Calendar: Any Event with Rooms & Resources Needed will not be visible to the Group until the Event is approved, otherwise, this is the default visibility of all Events. The event is only visible to group members.
- Public Calendar: The Event organizer can request the Event be placed on the public calendar. Selecting this calendar will make the event visible on the church website, and is visible to the public.
- Church-wide/Campus-wide Calendar: The Event organizer can request the Event be placed on the church-wide/campus-wide calendar. The event will be visible to all other groups within the church.
How do I make changes to an event?
-
-
Who can Edit Events?
- Full Group Admin
- Group Leaders (Main Group Leader, Assistant Leaders, Deluxe Version includes-Coaches and Directors)
- Department Admin for only the Groups assigned to their department
- Master Administrator
Changing Event Options
If you are editing a recurring Event, before you hit save, you will be asked what Events to make the changes for.

- If changing the name: All dates in this Event.
- If changing the date: This date only.
- If changing the start or end time or adding setup/ cleanup minutes: This date only and This date & all future dates.
- If changing the repeating pattern: This date & all future dates.
- If changing location info: This date & all future dates.
- If only the date is changed, then you will be able to apply the change only to that occurrence. If the time is changed, you should be able to select just that occurrence or the future occurrences option.
Note: These options are designed to keep your historical data intact.
Event Tabs
The Event detail page has the name of the Event at the tab along with several tabs of information across the middle. Use the Event Actions menu at the top right and select Edit Event to change any of the settings of the current Event.
Preview Tab
The Preview tab lets you see what the Event will look like to a basic user. If a person opens this Event either from within Church Community Builder or from without, this is how the information for the Event will be displayed. Take advantage of the preview to make sure your Event looks and gives the information you want to share with people.
Guest List
The Guest List on the Event Preview page is not meant to be an admin tool. It is meant to be what everyone can see. When an admin looks at it, they are seeing exactly what a congregant with no privileges will see. The parenthetical number is accurate for the total number in that category (yes, no, maybe, no response). The name list will hide unlisted, inactive, and age protected Profiles. Under the Guest List tab the parenthetical number will be the same as what is in the Preview. The name list will populate based in the current user’s privilege set. For example, the MA will see everyone. A Group leader with no other privileges will not see inactives, potentially not see age protected, and maybe not unlisted.

Rooms & Resources
Only Events set as ‘Rooms & Resources needed’ will have the ability to request Rooms & Resources. Check out this article for more information on creating and requesting Rooms and Resources.
Guest List
The Guest List tab allows you to both invite people to your Event and manage that guest list. Check out this article to learn more about inviting people to Events.
Tip: If this section is greyed out, the Event has not been approved and you cannot invite people until it has been approved.
Attendance
The Attendance settings can be adjusted by clicking the Attendance tab.
- Attendance Grouping: In order to take attendance you must select an attendance grouping. If none are available, you will need to set them up in the Group Settings in the Admin tab.
- Attendee Limit: This limits the number of people who can sign up for an Event.
- Attendance Reminder: This option will send an automated attendance reminder by email to the leaders of the Group. The first will come 1 hour before the Event in order to take attendance during the Event. It will also send up to 3 reminders (1 a day) after the Event if no attendance has been taken.
- Attendance Only: The purpose of attendance only Events is to declutter a Group’s Calendar. Checking this box will make the Event INVISIBLE on all Calendar views, except the ‘All Events Admin’ Calendar.
- Record Attendance: This button will only appear if the Event has an attendance grouping AND the Event is in the past
- Event Summary: This will display any Event summary if recorded for that Event
Check-In
The Check-In settings can be adjusted by clicking the Check-In tab.
- Attendance Grouping: The only setting required for the Event to be available for Check-In, choose from the list of groupings. If there are no groupings listed, then you need to edit the Group and select Attendance Groupings from the Admin tab.
- Room Name: (Deluxe version only) The room name will replace the name of the Event on the check-in label. It is currently only displayed on the check-in label.
- Child : Adult Ratio: (Deluxe version only) – Allows you to limit who can check into a room based on the number of adults in the room. In order to utilize this feature, the adult volunteers must be leaders of that Group. They must also check into the Event for the system to know how many adults are in the room.
- Attendee Limit: If a number is entered, the Check-In system will not allow people to be checked into that room once the limit is reached.
- Label Type: select the kind of labels you want to print for this Event. This will override the Check-In station default.
Publish
This tab gives you the status of how the Event is currently being published, along with links to request additional publication.
- Group Calendar: Any Event with Rooms & Resources Needed will not be visible to the Group until the Event is approved, otherwise, this is the default visibility of all Events.
- Public Calendar: If there is a link here, the Event organizer can request the Event be placed on the public Calendar. To unpublish the Event from Calendar re-clicking this link will unpublish the Event.
- Church-wide/Campus-wide Calendar: If there is a link here, the Event organizer can request the Event be placed on the church-wide/campus-wide Calendar.
- Download Event: The Download Event button to the right allows you to download an ical version of the Event to manually add the Event to a Calendar outside of the system.
Tip: Still have questions, check out the FAQs for Events.
-
How do I request a room or resource for my event?
Rooms and Resources are requested once an Event has been created and added to the Group Calendar.
- Open the Group where the Event was created.
- Choose the Calendar tab and select the event.
- Select Manage Event in the popup.

- Select the Request Rooms & Resources button on the Rooms & Resources tab.

- Request the Rooms and Resources needed for the Event.

- General Setup Notes: Should be a summary of the event day and time, and an overview of the rooms, resources, and setup that is needed. This is the first place the Facilities Team will look in their report to set up for the event.
- Estimated Attendance: Is important to verify room occupancies, and to select alternate rooms in the case of a scheduling conflict.
- Rooms: Are reserved by clicking the Rooms tab, selecting the desired room from the menu, and then dragging it to the Rooms box. There will be an additional option to provide setup details for each room when it is selected. If a room is not available for a certain date and time it has most likely already been reserved for a different event.
- Resources: Are requested by selecting the Resources tab, selecting the desired resource from the menu, and then dragging it to the Resources box.
What rooms are available for my event?
All Rooms listed on CCC may be reserved for an on-campus ministry event. Below is a summary of each Room along with the room’s maximum occupancy limit and its general use throughout the year.
Setup Options
When selecting your room, please choose your preferred room layout in CCC to help direct the Facilities setup team.

Rooms
Auditorium + Lobby
- Auditorium
- Max Occupancy 1,465
- General Uses: Conferences, worship, weddings, funerals, memorials
- Alcove
- Max Occupancy 60
- General Uses: Medium classes, information booths and tables
- Cry Room
- Max Occupancy 25
- General Uses: Speakers’ room, family room, Care Group meetings, Counseling
- Lobby
- Max Occupancy 238
- General Uses: Lobby, food service, reception
- Kitchen
- Max Occupancy 38
- General Uses: Food prep, food service
Classrooms
- Room 100
- Max Occupancy 85
- General Uses: Large classes, Care Group meetings, fellowship events
- Room 101
- Max Occupancy 41
- General Uses: Small to medium classes, Care Group meetings, fellowship events
- Room 102
- Max Occupancy 41
- General Uses: Small to medium classes, Care Group meetings, fellowship events
- Room 103
- Max Occupancy 245
- General Uses: Large classes, Care Group meetings, small conferences, memorials, banquets, fellowship events
- Room 104
- Max Occupancy 50
- General Uses: Medium classes, Care Group meetings, Children’s Ministry
- Room 105
- Max Occupancy 46
- General Uses: Children’s Ministry
- Room 106
- Max Occupancy 61
- General Uses: Nursery, Children’s Ministry
- Room 107
- Max Occupancy 49
- General Uses: Nursery, Children’s Ministry
- Room 108
- Max Occupancy 49
- General Uses: Small to medium classes, Care Group meetings, fellowship events
Other Rooms and Areas
- Green Screen Room
- Max Occupancy 168
- General Uses: Small to medium classes, Care Group meetings, fellowship events
- Courtyard
- Max Occupancy 168
- General Uses: Children’s Ministry, Care Group meetings, fellowship events, baptisms
- Counseling Office
- Max Occupancy 6
- General Uses: One-on-one and couples counseling
Bathrooms
Bathrooms are available on the north side of the building in the lobby, and in the south side of the bathroom near Room 108. Bathrooms are available to all events on-campus and cannot be reserved.
What resources are available for my event?
Below is a listing of all Resources available for your ministry events. Events are added on CCC in the Rooms and Resources tab when you select Manage Event.
A/V Equipment
- A/V Equipment Setup
- An A/V team member will set up the A/V resources and equipment that you have requested.
- A/V In the Auditorium
- This request is to use the stage, lighting, and audio in the auditorium. This always requires the assistance of A/V personnel. Please make your request as far in advance as possible to allow the personnel to be coordinated.
- Audio/Video Recording
- Select this option to record video and/or audio of your event. Please specify in the notes if the request is for audio recording only, or both audio and video recording.
- Microphone
- Select this resource if your event is on-campus and you require a microphone. Please indicate in the notes what type of setup is needed. E.g. one mic for the speaker, and one mic for the audience.
- PA System
- Select this resource if your event is off-campus and you require a microphone and speaker system.
- Presentation Computer
- This request is for a laptop computer with HDMI outputs for classroom and ministry presentations.
- Presentation HDTV
- Each room has its own HDTV for presentations. If you are planning to make use of the TV, please select this resource so we can make sure it is in the room you are using.
Catering
- In-House Catering
- Catering is generally available for special ministry events. Catering does not provide food and beverages for weekly ministries.
- Selecting this resource will let us know that you would like help catering your event, including the use of the kitchen.
- After choosing this option, an In-House Catering leader will reach out to you to assist you with your needs.
General
- Speaker Podium
- Select this resource if you need a podium and/or table for the speaker at your event. This will help our Facilities team know how best to set up your room.
Promotion – Digital
- Church-Wide Email
- Select this resource if you would like a church-wide email campaign to advertise your event.
- After choosing this option, a Create Services Team member will reach out to you to discuss your needs.
- Online Registration Form
- Select this resource if you would like a digital sign-up form for your ministry event. Payments can also be accepted online through this form.
- When requesting this resource, please submit a typed version of the form to the church office to be re-created online, and indicate the dates you would like the form to be available.
- Webpage on the Church Website
- Select this resource to have a page dedicated to your event, including information, links to forms, and other resources.
Promotion – Material
- Announcement In Bulletin
- Select this if you would like an announcement in the church bulletin. This may include a graphic and/or a QR code to a webpage with more information.
- Ministry Table (After Service)
- Select this resource to have a table set up either in the alcove or in the lobby for people to visit after Sunday service.
- Verbal Announcement
- Please use this to request a verbal announcement made from the pulpit on Sunday mornings at the end of the service.
Other Resources
- Zoom License
- Select this to request a zoom license under our church zoom account. This is requested on a ministry year basis.
Needs (CCC)
How do I create and manage group needs?
Needs are a feature within Groups and are hosted by one specific Group. Needs allow Group Members to put out requests that they have where someone else in the Group or the public could fulfill. Whether it be caring for a member who just had a baby, doing a neighborhood cleanup, or bringing items for a Group party, Needs have endless possibilities.

Here are examples of using Needs:
- Lopez Small Group has a Need just for their Group to bring meals for the family in their Group that just had a baby.
- Church-Wide Needs Group is used to host a Need for a church-wide campaign to fill items for backpacks for back to school and they’ve made it a Public Need to promote via the church’s website.
- Thursday Morning Bible Study is doing community service project and has a Need for the different items needed.
- The Care Ministry has a Need to take a member to dialysis care for the next month.
Who can Create Needs?
- Need Admin Privilege: Can create, edit and remove any Need across the Campus they are assigned.
- Group Leader/Assistant Group Leader: Can create, edit and remove a Need in their Group if a Group admin activates these privileges.
- Group Member: If settings in a Group are activated for Group members, a Group member can create, edit and delete a Need for that Group.
- Need Coordinator: Whoever is the creator of the Need is made the Need Coordinator, however, the creator can change the coordinator to anyone in that Group.
- Group Admin: Department Admins / Coaches / Directors can create, edit and remove Needs in the Groups they oversee.
Who can View Needs?
Who can see a Need is determined by the Group’s Membership Type setting.
- Groups that are “Open to All”: These Groups allow for all people in your church to find the Group, see the Need, and take an item.
- Groups that are “Invitation or Request Required”: These Groups do not allow people outside of the Group to see the Needs within the Group. Thus people outside the Group cannot take an item without being informed.
- Group Members and Leaders, regardless of Membership Type: Group members in Announce Only Groups or Members Interact Groups can view a Need in the Group when they log into the software or are informed of the Need.
If a Need should be available to everyone, you can use the Public List feature to add the Need to your Public Needs List. Check out this article for more details.
The Public Needs List
The Public Needs List the central place for all of the Needs that are available for anyone to sign up for.

- To make a Need available publicly, start by clicking on the Need you want.
- Click Edit this need under Actions.
- Select the Public List checkbox.
- Click the Save button.
- On the Need’s page, you’ll see that the Need is on the Public Needs List.

Tip: Use the view public needs list URL to publicize your Need via email, website, or text.
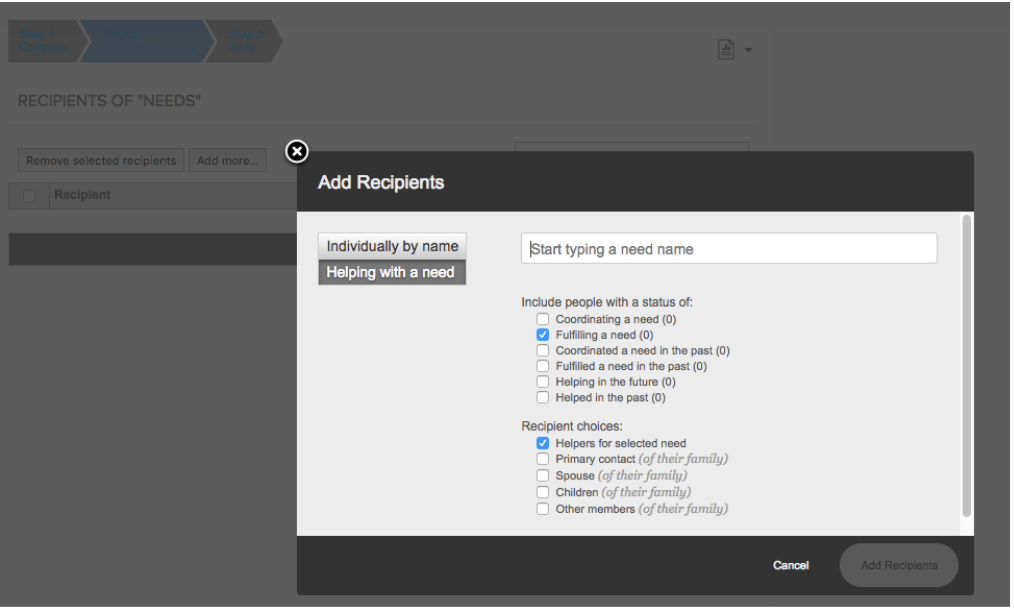
How do I inform people about a need?
Through Inform People
- Start by clicking on the Need you want.
- Click Edit this need under Actions.
- Click the Inform People button.

- This will bring up the Need Inform modal.

- In the Who? section, select the recipient(s).
- In the Email text section, you will be able to send a customized email to those in your group. Or to any individual from within the group’s assigned campus.
Tip: The Email Text is defaulted to plain text, but you can hardcode basic html (like bold, italics, and images)into the Email Text. Check out some simple instructions in this article.
- Use the From Box to let those you are informing who the Need is from if it is different that the Needs Coordinator.
- Those you have chosen to inform will receive an email with your message and a link to the Need.
Tip: A Need Reminder will be sent automatically to the responsible party two days prior to the need due date.
Through a Mail Merge
- Click on Mail Merge in the left navigation menu.
- Select a created mail merge or the Compose a new mail merge link.
- In Step 1, compose the Mail Merge.
- In Step 2, you can select those helping with a Need.
- Enter the Name of your Need.
- Select the checkboxes as needed for your recipients.
- In Step 3, send your Mail Merge.
- Check out this article for more information.
Once the Need Inform Email has been sent out, the selected people will receive an email notification of the Need. At the bottom of the email, there is a green View Need button. By clicking this button, they will be able to accept the Need without logging into the software.
They can choose any available Need by checking an empty I’ll take it box.
From the Public Needs List
If the Need is made public, then anyone who has access to the Public Needs List can sign up for an item in the Need.
- Go to the Public Needs List for your church.
- Select the item(s) you want to provide.
- Click the Sign Up button.
- Provide your name, email, and mobile number.
- Click Sign Up and Close.
- Check your email for the Magic link and confirm your sign up.

Need Notifications
-
- The Need Coordinator will be sent an email of the taken Need item.
- If the Need Coordinator removes you from a Need, you will receive email notification letting you know you have been unassigned.
- If you remove yourself from an item the Needs Coordinator is informed as well.
Church Office
How do I use the church copier?
The church copier is available to all ministries to print and copy materials.
The church copy machine is a Toshiba e-Studio 5516AC. Click the following link for an interactive manual on how to use this machine.
Alternatively, you can click this link for a .pdf guide of the copier’s basic operations. Basic Functions_eS8518A_QS_EN_0003
Where can I find office supplies and other materials?
Our Ministry Resource Room is located in the church office hallway. The Resource Room is stocked with office supplies available to you for your ministry activities.
Some items include:
- Pens, pencils, dry-erase markers
- Colored paper, construction paper
- Scissor, paper clips, tape
- Laminating machine and laminating sheets
- Paper cutter, paper folder
There are also multiple work spaces and surfaces available to you. You are encouraged to go in and look around. Please contact [email protected] if you see we are out of something you need.
Where can I find A/V supplies like cables and batteries?
Audiovisual supplies such as HDMI cables, batteries, power cables, computer cables, and webcams are located in the gray windowed supply cabinet in the supply room in the church office hallway.
Please contact [email protected] if you see we are out of something you need.